FireAngel’s Pro Connected range is the only system that allows you to create an interlinked network using mains-powered devices, battery-powered devices, or a combination of both.
When your alarms are connected:
If one alarm detects danger, every alarm in the network will sound.
Pressing the test button on any alarm will test the entire network.
You can build a network using:
Only battery-powered devices
Only mains-powered devices
A combination of both
Follow the steps below to interlink your FireAngel Pro Connected alarms and build your protective network.
Creating an interlinked network with wireless communication.
Install Alarm 1 as described in the manual (battery powered install here or mains powered install here).
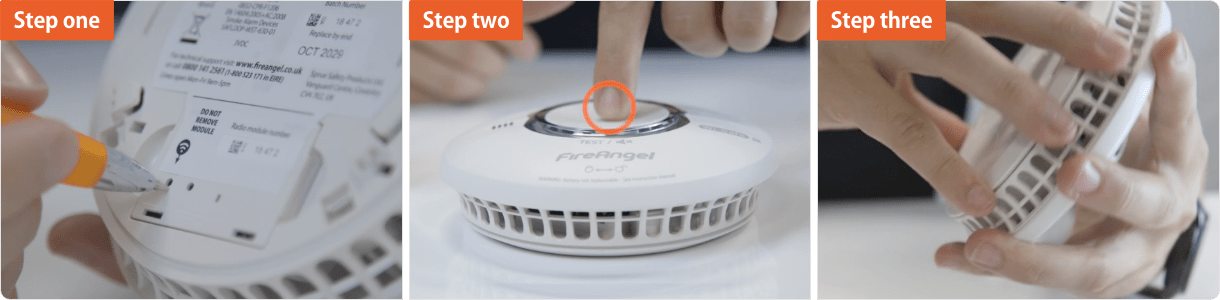
Then install the base plate for Alarm 2 in one of the recommended locations.
Using a ballpoint pen briefly push and release the ‘learn button’ on the back of Alarm 2. The red LED next to the learn button will flash briefly then light up for approximately five seconds.
During these five seconds you need to briefly press the test button on Alarm 1 to wirelessly interlink the two alarms. Alarm 1 will give an audible sound consisting of two cycles of three loud beeps.
The red LED on the wireless module of Alarm 2 will flash to indicate that it has been ‘learned-in’ successfully. If the test button is not pressed quickly enough, the ‘learn-in’ process will fail. If this happens, repeat the process.
To complete the installation, fit Alarm 2 onto it’s base plate.
Additional alarms should be ‘learned-in’ in the same way. When ‘learning-in’ additional alarms, any alarm already in the network, can be used as ‘Alarm 1’. You do not have to ‘learn-in’ to every alarm in the network.
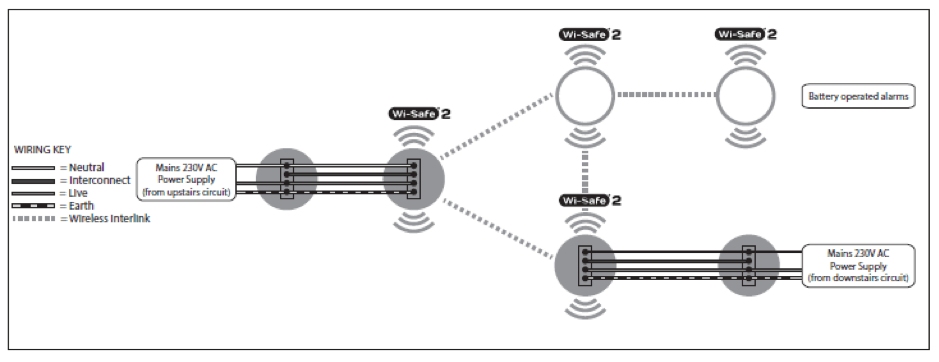
Combining hardwired interlinked and wirelessly interlinked technology.
To interlink multiple mains powered devices using the hardwire interlink method you need to firstly follow the steps found here. You can then continue with the above steps to add battery powered devices to this mains powered network.
PLEASE NOTE: Make sure there is only one wireless connection into each wired network. For example if you have a hardwired network upstairs and a wireless network downstairs only one of the hardwired products should be linked into the wireless network, connecting both systems.
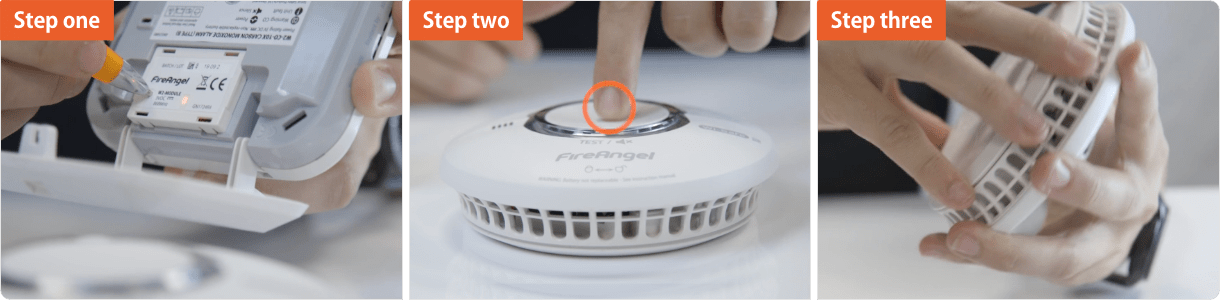
Adding a Pro Connected Carbon Monoxide alarm to the network
Including a CO detector into the network is simple, let Wes show you how – or follow the below instructions.
Using a ballpoint pen, briefly push and release the ‘learn button’ on the back of the CO detector.
The red LED next to the learn button will flash briefly then light up for approximately five seconds.
During these five seconds you need to briefly press the test button on an alarm that’s already wirelessly interlinked in the network as explained above (alarm 1). Alarm 1 will give an audible sound consisting of two cycles of four loud beeps.
Introducing our Ultra Slim Smoke and Carbon Monoxide Alarms
Can a carbon monoxide detector detect gas?
Staying warm in Autumn without the risk of fire and CO dangers
How many carbon monoxide alarms do I need?
New home checklist: Why a Carbon Monoxide alarm is essential
Got a burning question? Get in touch
If you can't find what your looking for on our blogs and looking for further guidance and advice, our UK-based Customer Support team are on hand all week from 8:30am until 5:30pm, they can answer any further queries you may have on our products, solutions or services.

